

Managing DV360 Deals
1. Overview
The DV360 Deal Sync feature connects the Verve Deal Portal with Google Display & Video 360 (DV360). It allows authorized Ad Operations users to create, submit, monitor, update, and cancel private DV360 deals from the Deal Portal. Buyers can review and negotiate their deals directly in the DV360 platform.
When you submit a deal, the Deal Portal creates the corresponding order and product in DV360. The buyer can then review the deal in the Negotiations section of DV360. After the buyer accepts the deal, the Deal Portal automatically changes the deal status from Pending Acceptance to Running . This update may take up to one hour, as the automatic synchronization job runs once per hour.
The currently implemented workflow described in this guide supports non-reserved private deals, including Private Marketplace (PMP) and Preferred Deals. Auction Packages are not supported yet.
Note:Access to the DV360 tab is currently limited to internal Verve administrators. Users with any of the following roles can access the DV360 tab without requesting additional access:
ONEUI_VERVE_PDP_PARTNERS_CURATION,ONEUI_VERVE_PDP_PARTNERS_VFA,ONE_UIV_VERVE_PDP_AGENCY,ONE_UIV_VERVE_PDP_DSP,ONEUI_VERVE_PDP_OMNI,ONEUI_VERVE_PDP_ADMIN. Other new users who need access must request it.
2. DV360 Deal Workflow
Creating and activating a DV360 deal involves the following stages:
- Create and configure the deal in the Deal Portal.
- Save the deal as a draft.
- Run the deal to submit it to DV360.
- Wait for the buyer to review the deal in DV360.
- Monitor the deal until it becomes Running.
The Deal Portal synchronizes submitted deals with DV360 every hour. You do not need to manually change a deal from Pending Acceptance to Running.
2.1 Understand DV360 Deal Lifecycle
The following diagram shows how a DV360 deal moves between the statuses displayed in the Deal Portal as you submit, update, or cancel it.
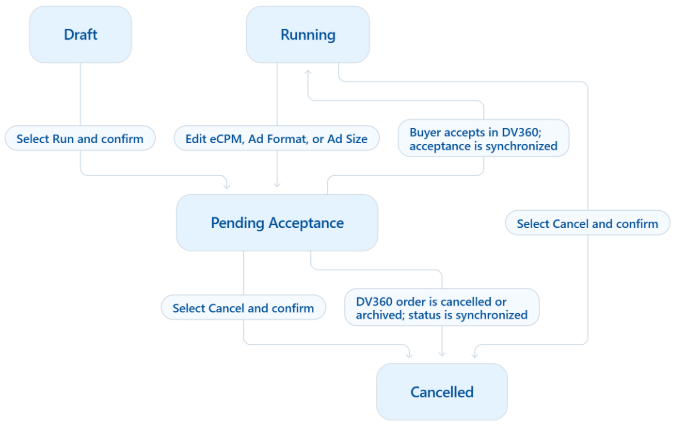
Figure: Deal Lifecycle
A saved deal starts in Draft status. When you run it, it changes to Pending Acceptance. After the buyer accepts it and the Deal Portal detects the acceptance, it changes to Running. Changes to the eCPM, Ad Format, or Ad Size of a Running deal require reapproval.
2.2 Understand DV360 Deal Statuses
The status of a DV360 deal indicates where the deal is in the submission and approval workflow.
| Status | Description |
|---|---|
| Draft | The deal has been saved in the Deal Portal but has not been submitted to the DV360 |
| Pending Acceptance | The deal has been submitted to DV360 and is awaiting buyer acceptance. A running deal also returns to this status when a change to its eCPM, Ad Format, or Ad Size requires buyer approval. |
| Running | The buyer has accepted the deal and the Deal Portal has detected the acceptance during synchronization. Only Running deals are eligible for ad serving. |
| Cancelled | The deal has been cancelled and cannot be run again. |
Note:In exceptional cases, a deal may enter Sync Failed status, which stops repeated synchronization attempts for a misconfigured or failing deal. Engineering must investigate, resolve the issue, and manually reset the status to Pending Acceptance.
3. Prerequisites
Before you begin
- Your account has permission to view and manage DV360 deals.
- The selected buyer seat has a valid seat ID.
- The deal includes exactly one ad format. Rewarded video is not supported.
- Start and end dates are provided.
- The start date is earlier than the end date and is not in the past.
- The eCPM is between $0.01 and $1,000.00
Note:Select a Smaato buyer seat. VGI is not currently activated for the DV360 Seller API. Submitting a VGI deal can fail, leaving the deal in Draft status without a DV360 Order ID.
The Deal Portal uses the marketplace deal ID as the external deal ID for this sync purposes.
4. Access DV360 Deals
-
Sign in to the Verve Deal Portal.
-
Open the Deals Dashboard and then Select the DV360 deals view.
-
The DV360 deals view displays your DV360 deals and their current statuses.
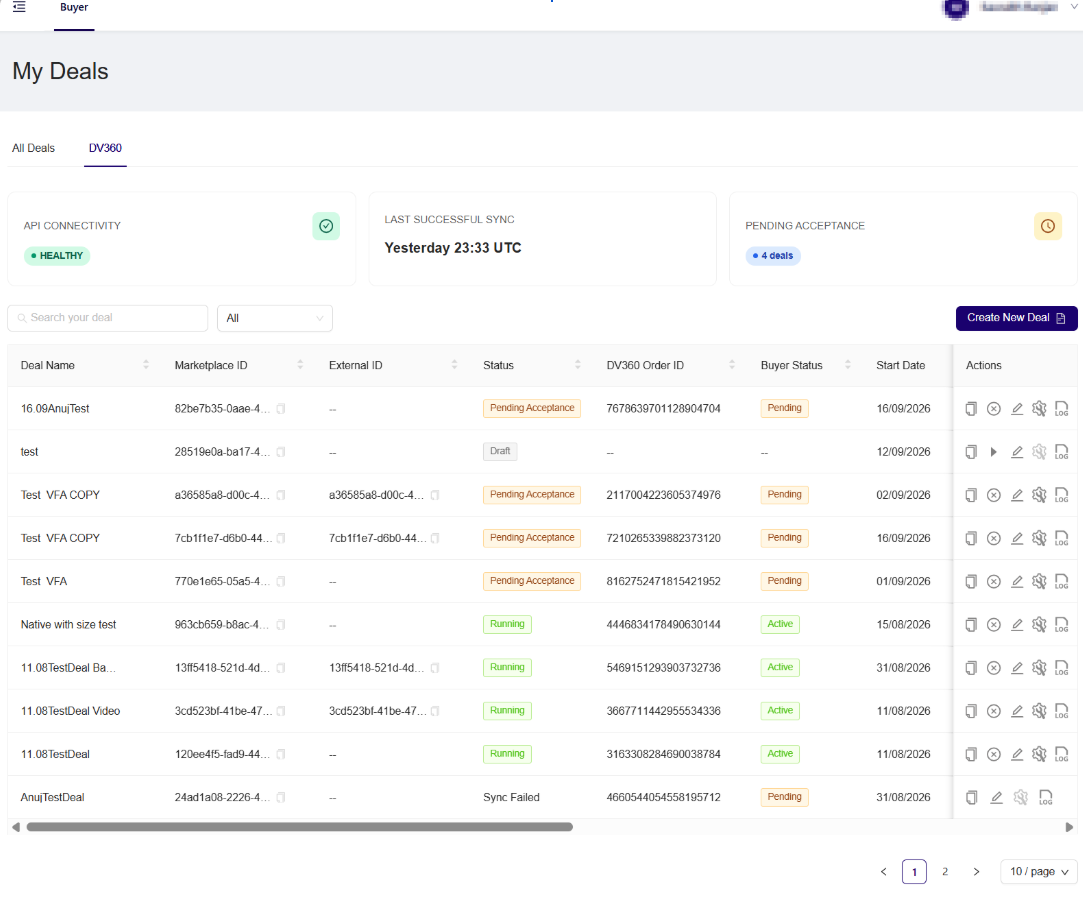
Figure: DV360 deals view
4.1 Monitoring Synchronization Health
Use the health information displayed in the DV360 deals view to monitor the integration:

Figure: DV360 Health Card
| Health Card | Description |
|---|---|
| API Connectivity | Shows Healthy, Unhealthy, or Unknown based on synchronization activity |
| Last Successful Sync | Shows the UTC timestamp of the latest successful synchronization job. |
| Pending Acceptance | Shows the number of DV360 orders currently awaiting buyer acceptance for the applicable buyer. |
4.2 Search and Filter Deals
Use the search field and filters to locate specific DV360 deals or narrow the list of displayed deals.
Search for a deal
-
In the search field, enter a search term for the deal you want to find.
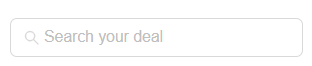
Figure: Search Your Deal
-
You can search your deal by your Deal Name or Marketplace ID.
Filter deals by status
-
Select the status filter.
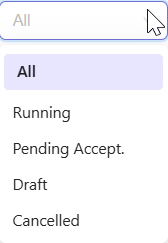
Figure: Filter deal
-
Select one of the following options:
- All — Displays deals in all statuses.
- Running — Displays deals that are currently running.
- Pending Acceptance — Displays deals awaiting buyer acceptance.
- Draft — Displays deals that have not yet been submitted to DV360.
- Cancelled — Displays cancelled deals.
-
Review the deals matching the selected status.
-
Select All to remove the status filter and display the complete deal list.
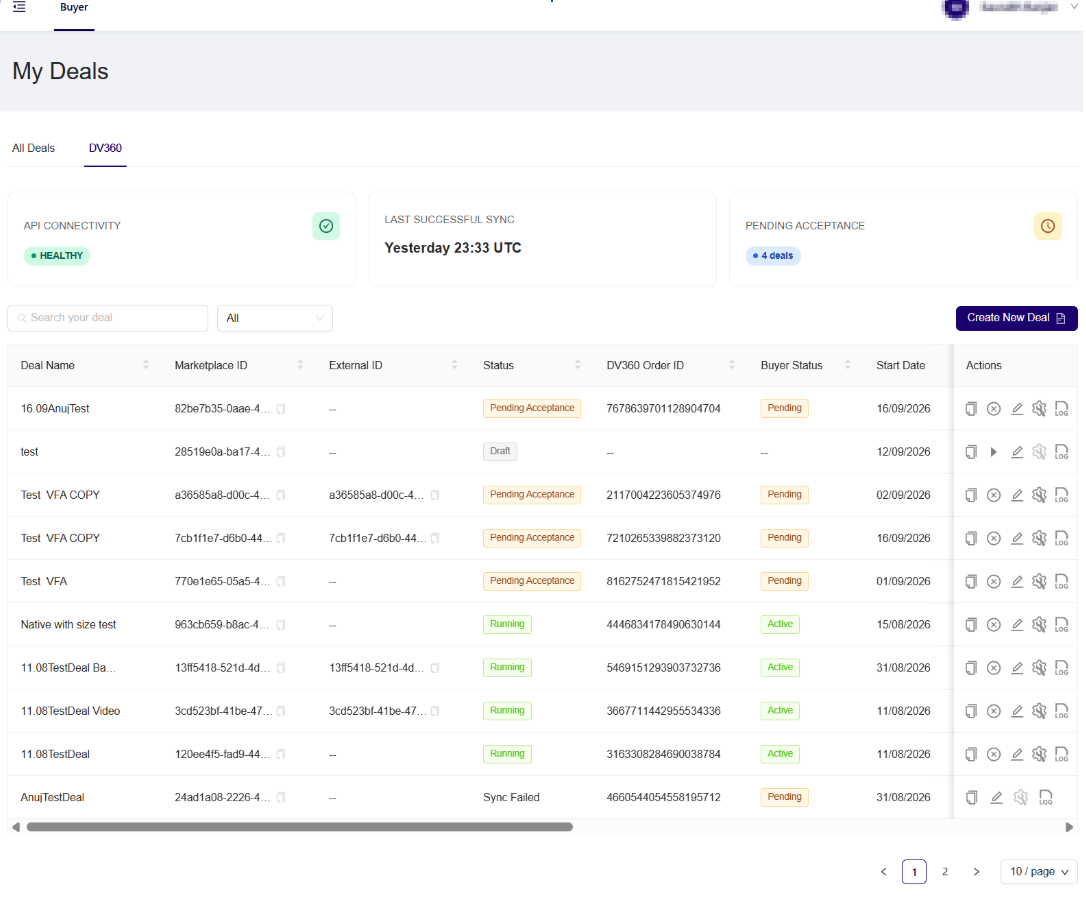
Figure: Filter all deals
4.3 Understand Deal Information
The DV360 deals view displays only deals associated with DV360. Depending on the available columns, you can review information such as:
| Column | Description |
|---|---|
| Deal Name | Name assigned to the deal. |
| Marketplace ID | Deal Identifier generated by the Deal Portal. |
| External ID | Exchange-side identifier sent to DV360. |
| Status | Current Deal Portal lifecycle status. |
| DV360 Order ID | Identifier of the corresponding DV360 order. It becomes available after the deal is submitted successfully. |
| Buyer Status | Buyer-related status derived from the Deal Portal lifecycle |
| Start Date | Date on which the deal is scheduled to begin |
| End Date | Date on which the deal is scheduled to end |
| eCPM | Price configured for the deal |
| Seat Name | Buyer seat associated with the deal |
| Advertiser | Advertiser associated with the deal, when available |
| Actions | Actions currently available for deal |
5. Create DV360 Deal
DV360 deals must be created from the DV360 deals view. The demand-side platform is automatically set to DV360.
-
From the DV360 deals view, select Create New Deal.
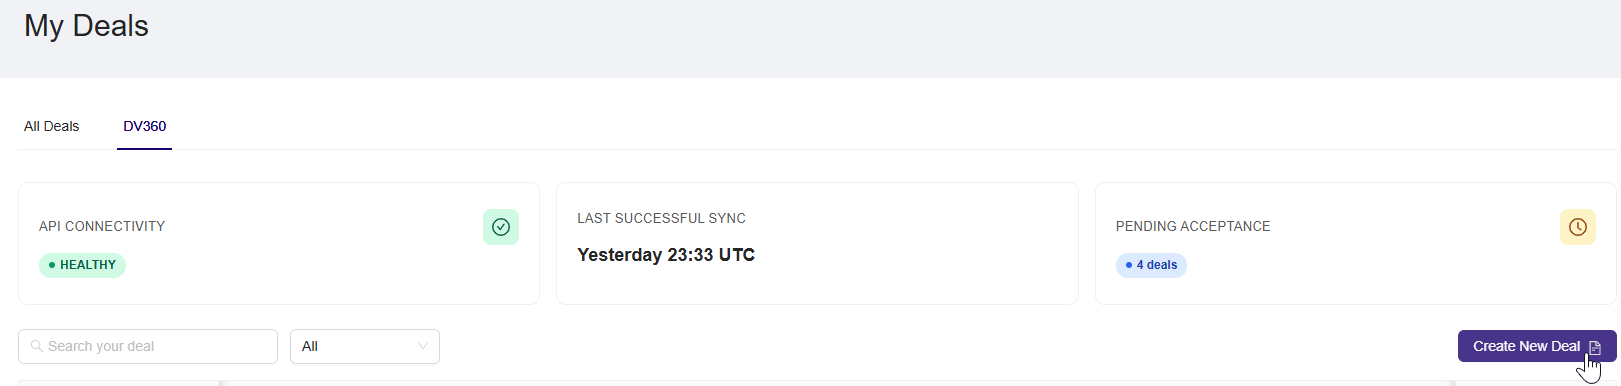
Figure: Create a new DV360 deal
5.1 Configure the Deal Settings
In the Deal Setting step, provide the general and pricing information for the DV360 deal.
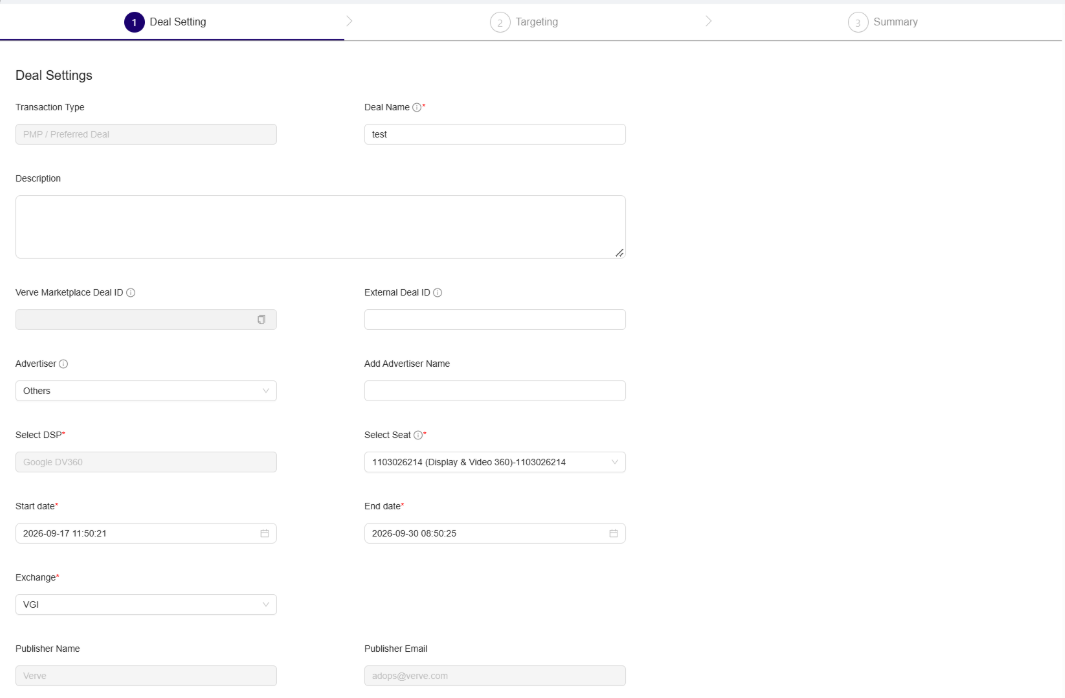
Figure: Configure Deal Settings
-
Review the Transaction Type. For DV360 deals, it is automatically set to PMP / Preferred Deal and cannot be changed.
-
In Deal Name, enter a unique and descriptive name for the deal.
-
In Description, enter additional information about the deal, if required.
-
Review the Verve Marketplace Deal ID. This value is generated by the Deal Portal and cannot be entered manually.
-
In External Deal ID, enter an external identifier, if applicable.
-
From Advertiser, select the advertiser associated with the deal.
If you select Others, enter the advertiser’s name in Add Advertiser Name. -
Review Select DSP. For DV360 deals, it is automatically set to Google DV360 and cannot be changed.
-
From Select Seat, select the DV360 buyer seat associated with the deal.
-
In the Start date, select the date and time when the deal should begin.
-
In the End date, select the date and time when the deal should end.
The start date must be earlier than the end date and must not be in the past.
- From Exchange, select the exchange through which the deal will run.
- Review the following automatically populated publisher information:
- Publisher Name
- Publisher Email
5.2 Configure the Price Settings
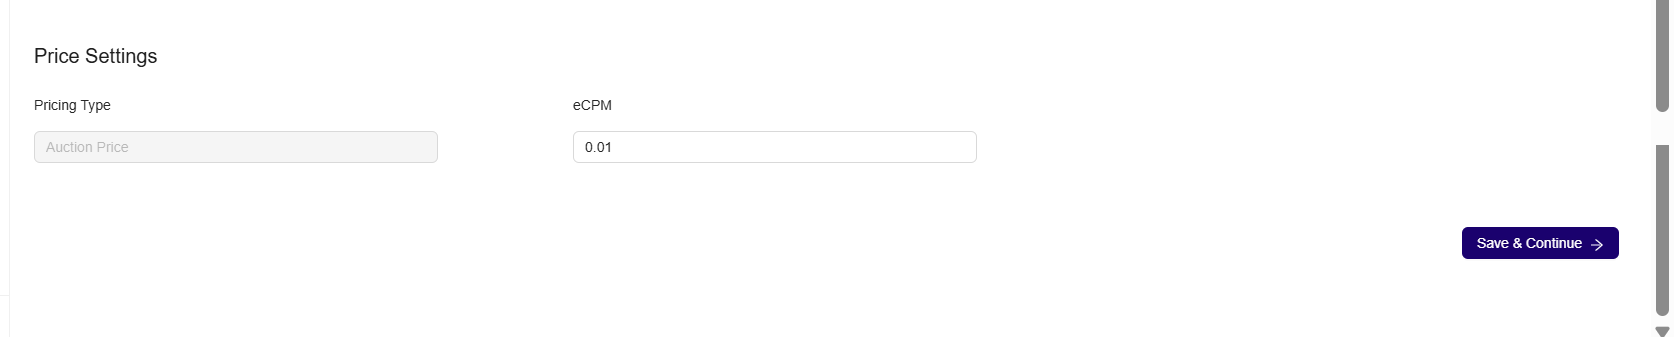
Figure: Configure Price Settings
-
Under Price Settings, review Pricing Type. It is automatically set to Auction Price and cannot be changed.
-
In eCPM, enter the price for the deal.
The eCPM must be between $0.01 and $1,000.00.
-
Select Save & Continue to save the deal settings and proceed to the Targeting step.
5.3 Define the Targeting Criteria
In the Targeting step, select the inventory and audience criteria for the deal. Ad Format is the only required targeting field. All other targeting categories are optional.
-
Under Define your deal’s ad formats and ad sizes, select the targeting condition for Ad Format.
-
Select an ad format from the Please select field.
You must select one ad format before you can continue.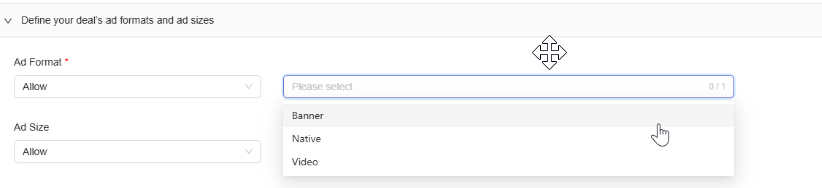
Figure: Select one Ad Format
-
Optional: Under Ad Size, select the targeting condition and the applicable ad sizes.
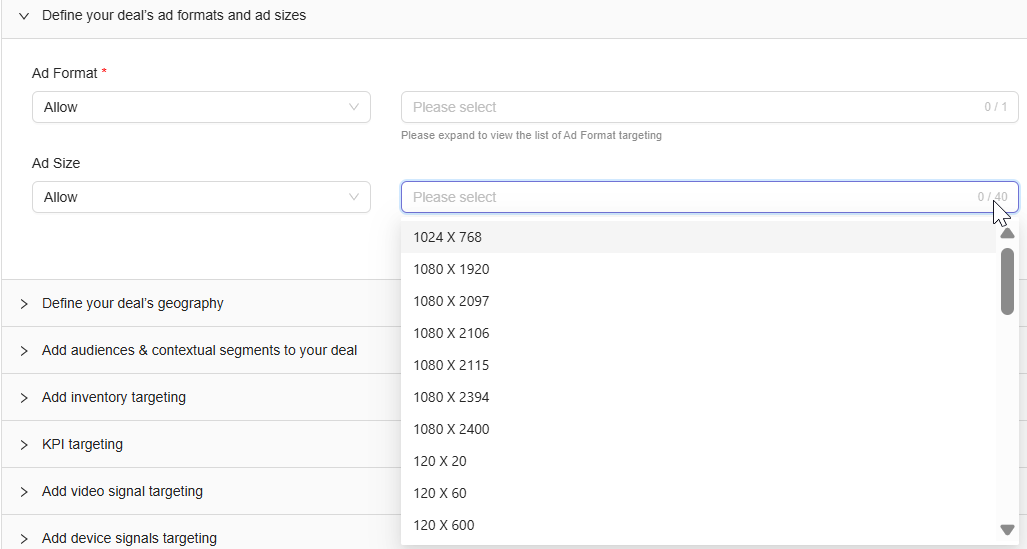
Figure: Select multiple ad-size dimensions
-
Optional: Expand and configure any of the following targeting categories:
-
Select Save & Continue to save the targeting criteria and proceed to the Summary step.
Note:Fields marked with an asterisk (
*) are required. On the Targeting page, only Ad Format is required. If you do not configure an optional category, it is not applied to the deal.
5.4 Review and Save Deal
In the Summary step, review the deal settings, price settings, and targeting criteria before creating the deal.
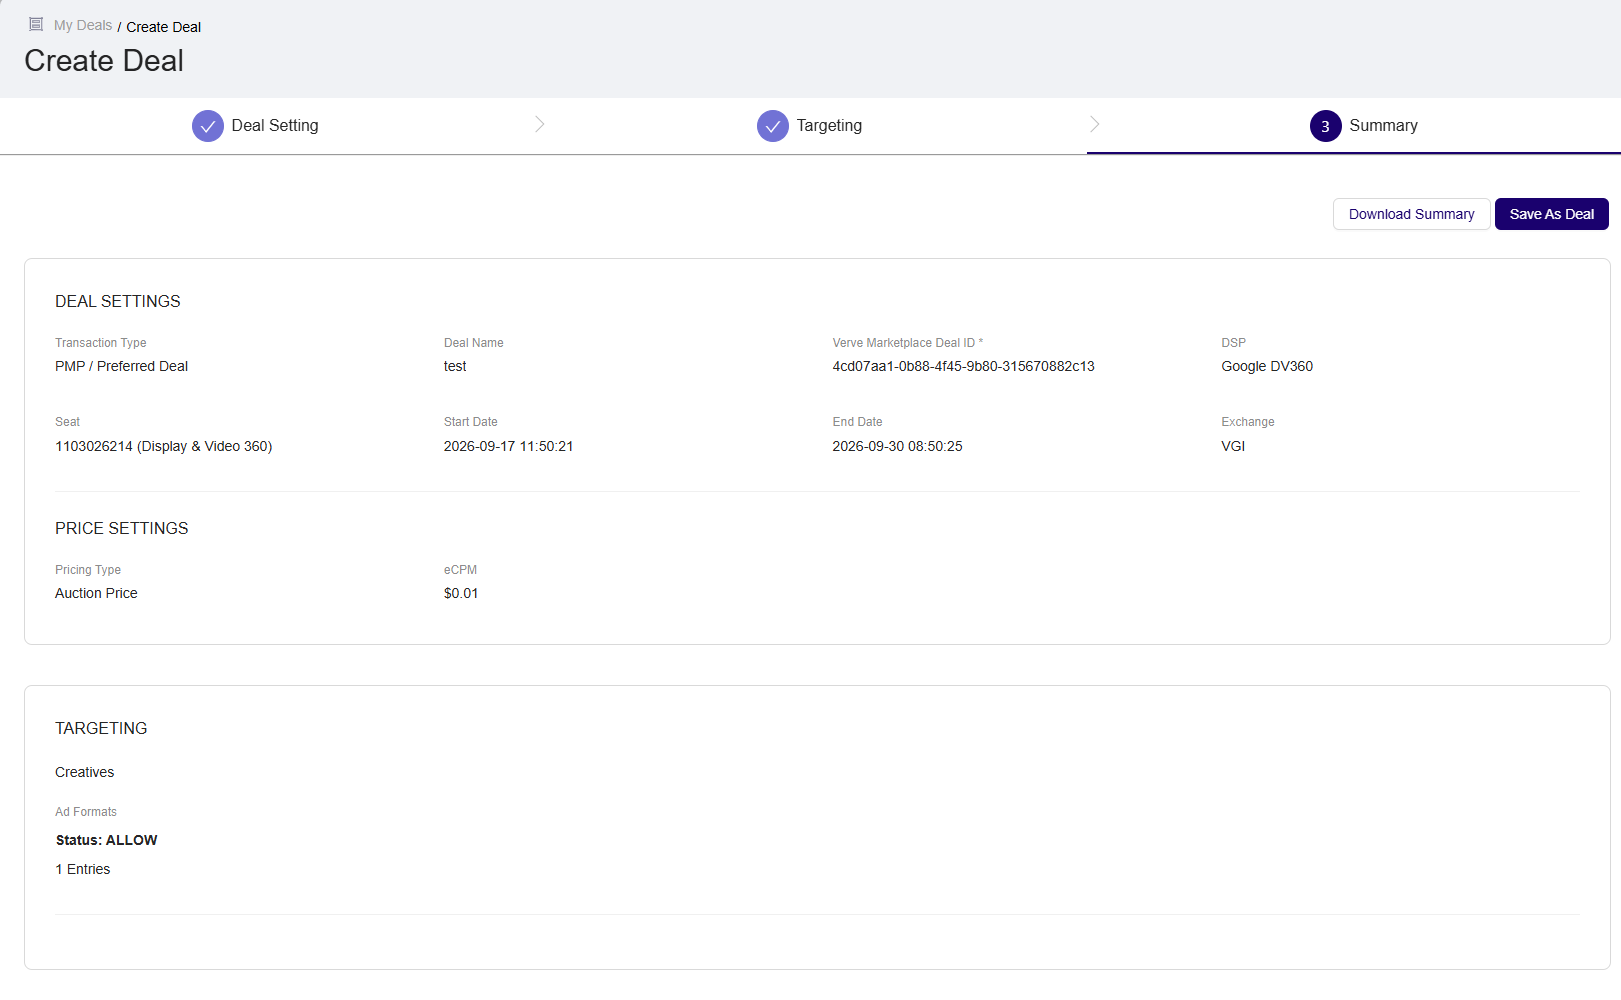
Figure: Review and Save the Deal
-
Under Deal Settings, verify the following information:
- Transaction Type
- Deal Name
- Verve Marketplace Deal ID
- DSP
- Seat
- Start Date
- End Date
- Exchange
-
Under Price Settings, verify the following information:
- Pricing Type
- eCPM
-
Under Targeting, verify the selected ad format and any optional targeting criteria configured for the deal.
-
If any information is incorrect, return to the Deal Setting or Targeting step and update it.
-
Select Download Summary to request a copy of the deal configuration. The summary is sent to your registered email address.
-
Select Save As Deal to create the deal.
After the deal is saved, it appears on the deals page with the Draft status. The deal is not submitted to DV360 until you run it.
Note:Review all information carefully before selecting Save As Deal. Ensure that the buyer seat, dates, exchange, eCPM, and ad format are correct.
6. Run DV360 Deal
After you select Save As Deal, the Deal Portal redirects you to the DV360 tab and displays the Deal saved successfully! confirmation message. The newly created deal appears with the Draft status.
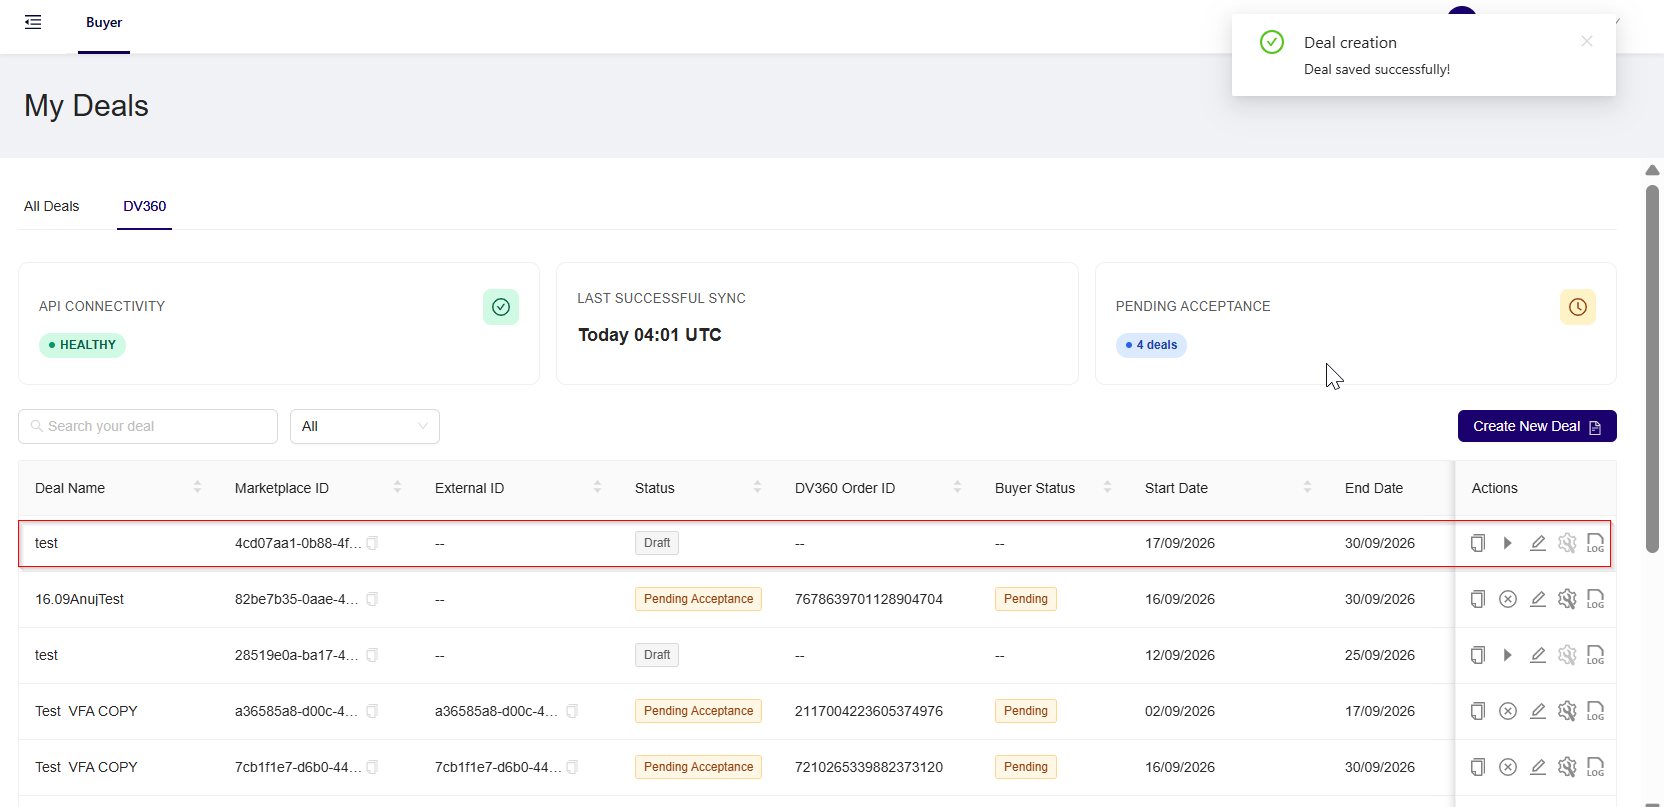
Figure: Run the Deal
To submit the deal to DV360:
-
Locate the newly created deal in the deals table. Use the search field or select Draft from the status filter.
-
Verify that the deal is in the Draft status.
-
In the Actions column, select the Run icon.
-
In the Confirmation dialog box, select Run to DV360.
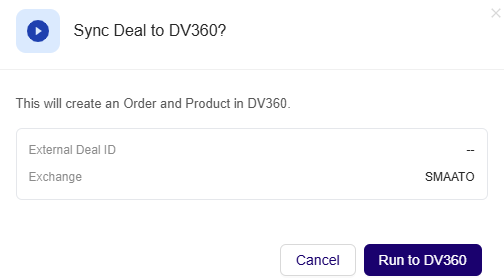
Figure: Sync Deal to DV360
- The Deal Portal submits the deal to DV360 and perform the following actions:
-
Checks whether a DV360 product already exists for the External Deal ID. If one exists, the Deal Portal associates the existing identifiers with the deal; otherwise, it creates a new DV360 order and product.
-
Displays the DV360 Order ID in the deals table.
-
Changes the deal status from Draft to Pending Acceptance.
-
Changes the Buyer Status to Pending, indicating that the deal is awaiting the buyer’s acceptance in DV360.
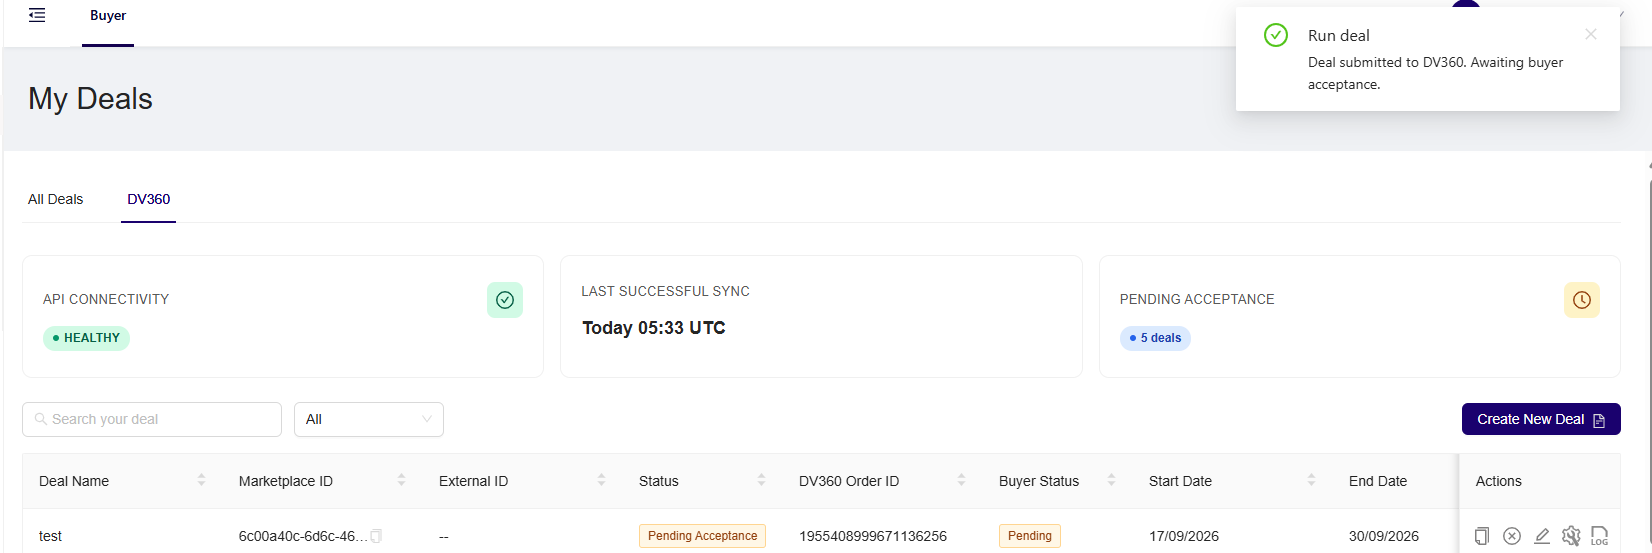
Figure: Deal Status change to Pending Acceptance
-
-
The buyer reviews and accepts the deal from the Negotiations section of the Google DV360 console.
-
The Deal Portal checks the acceptance status during its hourly synchronization. After the buyer’s acceptance is detected:
-
The deal status changes from Pending Acceptance to Running.
-
The updated status appears in the Deal Portal.

Figure: Deal status change to Running
-
7. Manage DV360 Deal
The actions available for a DV360 deal depend on its current status:
| Deal Status | Available Actions |
|---|---|
| Draft | Duplicate, Edit, Run, Change Log |
| Pending Acceptance / Running | Duplicate, Edit, Cancel, Troubleshoot, Change Log |
| Cancelled | Duplicate, Change Log |
7.1 Duplicate DV360 Deal
Use the Duplicate action to create a new DV360 deal based on an existing deal. The action is available regardless of the original deal's status. The duplicated deal is created in Draft status so that you can review and update it before submitting it to DV360
Duplicate a deal
-
From the DV360 deals list, locate the deal you want to duplicate.
-
In the Actions column, select Duplicate.

Figure: Duplicate the deal
-
In the confirmation dialog, select Copy Deal.
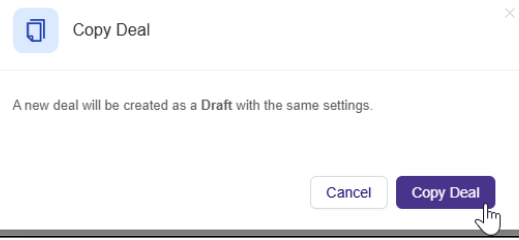
Figure: Confirm deal duplication
-
The Deal Portal copies the applicable settings, such as the targeting criteria, buyer seat, eCPM, and exchange.
-
The duplicated deal is created with:
- Draft status
- A new Marketplace Deal ID and External Deal ID
- No DV360 Order ID or Product ID
- No previously assigned order status or buyer status
- Blank start and end dates
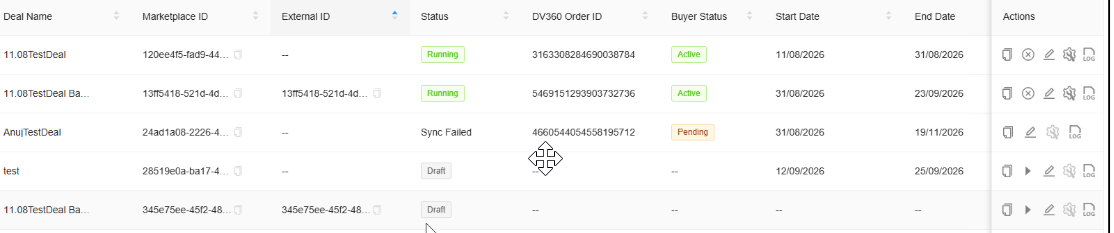
Figure: Duplicated deal in draft status
Note:The Duplicate action is available regardless of the original deal’s status. Before running the duplicated deal, add the start and end dates and review all copied settings.
7.2 Edit DV360 Deal
Use the Edit action to update the settings or targeting criteria of an existing DV360 deal. Editing follows the standard Deal Portal workflow. However, changes to the eCPM, Ad Format, or Ad Size targeting of a Running deal require approval in DV360.
To edit a DV360 deal:
- From the DV360 deals list, locate the deal that you want to update.
- In the Actions column, select Edit.
- Update the required deal settings or targeting criteria.
- Review your changes and save the deal.
If you changed the eCPM, Ad Format, or Ad Size targeting of a Running deal:
- The deal status changes from Running to Pending Acceptance.
- An authorized user reviews and manually approves the changes in the Google DV360 console.
- The Deal Portal checks the approval status once every hour.
- After the Deal Portal detects the approval, the deal status changes back to Running.
7.3 Cancel DV360 Deal
Use the Cancel action to withdraw a submitted DV360 deal. You can cancel only deals in Pending Acceptance or Running status.
Cancelling a deal also cancels the corresponding DV360 order. The cancellation is final, and the deal cannot be run again. To reuse similar settings, duplicate the cancelled deal and configure the resulting Draft deal.
A deal can also become Cancelled automatically when the Deal Portal detects that the corresponding order was cancelled or archived in DV360.
To cancel an eligible DV360 deal:
-
From the DV360 deals list, locate the deal that you want to cancel.
-
Verify that the deal is in Running or Pending Acceptance status.
-
In the Actions column, select Cancel.

Figure: Select the Cancel action
-
In the confirmation dialog, confirm the action.
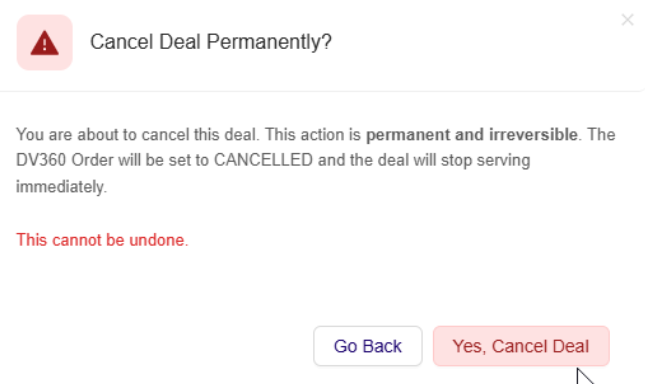
Figure: Confirmation deal cancellation
-
The deal changes to Cancelled and can no longer be run, edited, or troubleshot. However, you can still duplicate the deal or request its change log.

Figure: Cancelled deal
7.4 Troubleshoot DV360 Deal
Use the Troubleshoot action to investigate a DV360 deal in Pending Acceptance or Running status. The Bid Funnel action is unavailable for deals in Draft and Cancelled status.
To troubleshoot a DV360 deal:
-
From the DV360 deals list, locate the deal that you want to troubleshoot.
-
Verify that the deal is in Pending Acceptance or Running status.
-
In the Actions column, select BidFunnel

Figure: Select the Bid Funnel
-
Follow the standard Deal Portal troubleshooting workflow to review the available information.For complete instructions, see Troubleshooting a deal.
7.5 View Change Log
Use the Change Log action to request a record of changes made to a DV360 deal.
The change log is sent to the email address associated with your Deal Portal account as a spreadsheet. It includes information such as the action performed, the user who performed it, the timestamp, the updated field, and its old and new values.
To request a deal’s change log:
- From the DV360 deals list, locate the deal whose change history you want to review.
- In the Actions column, select the Change Log icon.

Figure: Select the Change Log action
-
In the Change Log dialog, verify the displayed email address.
-
Select Confirm to request the change log.
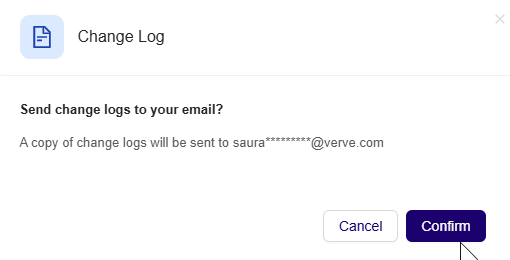
Figure: Confirm the change-log request
-
Open the email sent to your registered email address and download the attached spreadsheet.
-
Open the spreadsheet to review the deal’s change history.
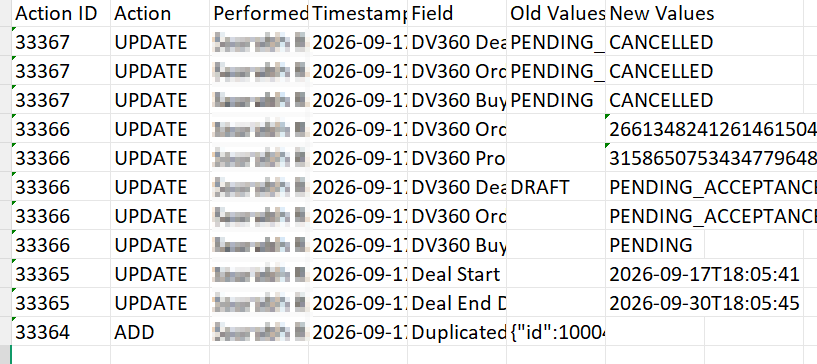
Figure: Review the downloaded changelog
The spreadsheet can include the following information:
- Action ID
- Action
- Performed By
- Timestamp
- Field
- Old Values
- New Values
For more information, see Change Log.
Updated 1 day ago